2Sculpt

Italy: Land of Sculpture

 Yes, they are everywhere. I found many off the beaten path last year.  A visit to the Cimitero Monumentale di Staglieno demonstrates this abundance. Since the mid-19th century,  Genoans honor their deceased with elaborate marble carvings. There are likenesses, angels, and family members all preserved in stone niches. (1.5 miles north of Carrara; see 2sculpt.com for more pictures)


And then there is the home of Leonardo in the town, of course, of Vinci. There are replicas of his many inventions and most famous paintings. This modern steel sculpture is based on his sketch of human proportions.  Obviously, I generally fit the model.

What’s So Hard?

When choosing a stone for sculpting we must consider its consistency (how fragile it may be), it’s patterning (how busy it is), and its workability (its hardness). The MOH scale is a quickly accelerating rating of stone from “1” for soapstone to “10” for diamonds. Other factors such as molecular structure can also affect hardness. Here is a rough guide to our most commonly used stones:

1        Soapstone

1.5    Alabaster

2       Limestone and Steatite

3       Softer Marbles and Travertines

4       Harder Marbles, Calcites, Onyx

6       Granite and Basalt


Some of us like the harder stones. We get sharper lines, more exacting cuts, and beautiful finishes. With the right tools we can cut, chisel, and polish with reasonable effort.

Chisels

There are hand and air hammer chisels – and rarely should the two meet.  That is an air hammer chisel should never be struck by a hand-held hammer. That distorts the shank of the chisel which, in turn, distorts the piston of the air hammer (very serious). There is a striking cap that can be placed over the air hammer chisel to protect it, though.

Stone carving chisels can have steel or carbide tips.  Steel ones are sharper but need to be sharpened more often.  The carbide ones are much stronger but because of the carbide insert they are “fatter.” On softer stones, the steel chisels produce cleaner lines. On harder stones, the carbide ones make more chips. Note that carbide is a brittle metal so protect these valuable tools from dropping on concrete or smacking against each other.

When using chisels stone must be coming off. If the chisel is held too steeply into the stone (like 90° )the chisel may break. If the chisel is held too acutely (like 15° ) it will just glide over the stone.  Experiment with angles until you are actually carving.  Never, ever use a chisel as a pry bar or try to knock off too big a chunk.

Sandbags

For smaller or uneven stones a sandbag will stabilize the art-to-be. You can cut the legs off an old pair of jeans, fill it 2/3rds with play sand, and seal the ends with plastic ties. I like using old truck tire tubes from my car repair place (sometimes a little hard to get, but free). I then cut them in half or thirds and similarly secure them with ties after filling them partially with sand. This way if I hit the rubber “bag” with my grinder it just bounces off rather than cutting it open.

Sanding Tips

You must use silicon carbide sandpaper (or diamond sheets or pads). The grains of aluminum oxide paper quickly round out and stop cutting.

I use the first two grits of sandpaper dry and the rest wet. I wash off the stone between grits and allow it to dry for inspection before continuing. I then use a crayon to note the place I missed and continue. You can use an old sheet of 1000-grit sandpaper for a few minutes between grits to bring out missed scratches. Tongue depressors, ice cream sticks, small flap wheels, cone-shaped tapers, and silicon carbide rubbing sticks all aid in getting into tight places. Silicon rubbing “blocks” are flat surface chunks which, when used wet by hand, can get the bumps out of a surface. (Bumps are often felt while not seen.)
Half your sanding time is on the first grit—getting out those deep scratches. Then the next grit might be 1/4 your time and so on. The last grit is a “breeze.” Scratches hold light. Get them out and the stone glistens.

taper silicon_carbide_flapwheelSC Griding SticksSC Grinding BlockDiamond Hnd Pad

Mounting Sculptures

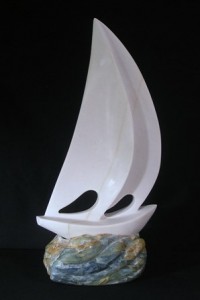
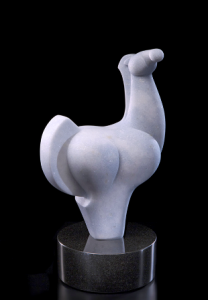
A base is like a frame. It accentuates the sculpture. It is important to select a base that is not too busy or large for the sculpture. You don’t want to take attention away from your masterpiece. You want to have a stable base but sometimes it looks best if the sculpture overhangs its support. On the other hand, the “footprint” of the sculpture should be at least and generally not much more than 1-1.5″ from the edges of the base. As a very general rule, the height of the base should not be more than 1/3 the height of the sculpture. The base can be granite, irregular stones, steel, plexiglass wood (I like ebony stained walnut), etc.

OLYMPUS DIGITAL CAMERA

©2015 Ken Miduch

This is an art, not a science, so each case is different.

Azzurro Acquamarino Marble

©2015 E. Woodbury

Here is the detail methodology of “basing”:

• Get a flat and level surface to work upon
• Determine sculpture position; secure and hold it
• Mark bottom level line
• Cut bottom; check for flatness (might use a tile)
• On larger bases, cut out center of the bottom to make flattening easier
• Determine hole location in sculpture bottom (find center with a pebble)
• Drill hole with hammer or core drill (consider the bedding plane)
• Determine hole in base: mark sculpture footprint on the base or cut out a template (cardboard or masonite); mark “up”
• Drill base
• Decide on pins: stainless steel or turning pin: gluing one or both sides or using threaded connectors. Consider the ultimate weight of the piece.
• Put non-scratch feet base or adjustable feet on larger pedestal
• Proudly display sculpture

General Safety

All the stones sold from 2sculpt are safe: no asbestos, arsenic, radioactivity or trans-fatsRespirator. Still, you should always wear a paper mask and safety glasses. If you are using power tools and therefore creating a lot of dust you need ear protection and should have on a respirator.  Whereas a paper mask catches about 40% of the dust, a double respirator labeled as P100 will provide about 99% protection. Gel bicycle gloves without the fingers are my favorite for vibration.