Tools

Pinning

Bases are the frames for sculptures. To mount stone to a base you must use a pin to connect them (just glue will break apart). This should be a stainless steel rod so it won’t rust or a brass turning pin.

To mount a turning pin drill the two holes: base and sculpture.

Grind a little of the hole in the sculpture so the “cap” is level with the bottom. Let the cap sit on top of the base. This provides some separation for turning. Test before gluing with epoxy. If the sculpture still rubs on the base when rotated, you can put a brass washer over the base hole to raise it up.


Power Tools

The most important tools are the basic hand chisels, a 1.5# hammer and a rasp. The first power tool should be an angle grinder (7.5 amps or more) and a diamond blade (or a Dremel if working very small).

The next step is a big but wonderful one: an air compressor. This will open up a world of lighter but more powerful tools. A portable compressor should be rated for at least 4.6 cfm at 90 psi (30 gallons). This will run an air hammer. To drive an air grinder you need a larger stationary machine that preferably has at least 12 cfm at 90 psi. If you use the portable compressor, there is nothing wrong with getting an electric die grinder that uses 1/4” shaft tools.

Dremel Etching

Mark Donadio showed me how he etched a picture onto stone. He uses hobbiest Mod Podge to glue a picture to a flat stone. After it dries thoroughly he can rub the paper away with a sponge. The picture is then on the surface. He then uses a Dremel with a pointed bit to etch the picture after which he can clean the transferred image off. I imagine this would be a good way of doing a bas relief with chisels, as well.


Flying Hammer Heads

Petro warns against flying hammerheads. Dry weather makes wood handles shrink. Soak the head and handle end in a solution of antifreeze (Propylene Glycol specifically) and linseed oil (50/50%). The solution gets into the wood cells and they remain “swelled”.


Sanding Tips Pt. 2

I use the first two or three grits of sandpaper dry and the rest wet.

I wash off the stone between grits and allow it to dry for inspection before continuing. Use an old sheet of 1000-grit sandpaper for a few minutes between grits to bring out missed scratches.

Half your sanding time is on the first grit—getting out those deep scratches. Then the next grit might be 1/4 your time and so on. The last grit is a “breeze.”


Blade Safety

First, those black abrasive blades are dangerous – my commentary. Diamond blades are wonderfully fast, long lasting and safe if used wisely. Use no more than a 5” blade on a 4.5” angle grinder (<12,001rpm): a 7” blade on a <8001rpm grinder: a 9” blade on a body grinder (<6001rpm). The best blades have hubs/flanges so they screw onto the the grinder. Make sure the blade is firmly on the arbor of the grinder, connected by almost all the screw threads. Regularly check the tightness of the screws of the hub. Never twist the blade during the cutting process and avoid putting the blade all the way into the 12 stone; leave at least 1⁄4” space to the hub. Check for cracks regularly.


Blade Types

Use the right diamond blade for the stone and tool. Sintered blades are great for alabaster, limestone, and very hard marbles. They are the most durable but are not good for soft or medium marbles. Electroplated blades are for alabaster and marble and cut the fastest. Vacuum-brazed diamonds are the most versatile for alabaster, limestone, and marble. Since the diamonds are partially melted into the metal they have good longevity but are a little slower.


Devilish Details

Wanna get the finest detail? Try small carbide burrs. These are double cut steel burrs in 1/32” to 1/8” sizes for Dremel machines. With a steady hand you can get the most minute hairs or textures. The three basic types are rounded, fishtail (“V” on the edge”) and flame. I found the Dremel 3000 was not that expensive and very steady. The cheaper ones wobble. (We have the burrs individually or in a kit.)

^Not actual size; much smaller


^Not actual size; much larger
by Al Brown, master of detail

The Miracle Workers: Rouge, Tin and Magic Potion

“Rouge” literally means red. Not so in the polishing business: it means fine abrasive. After sanding up to 600 (higher on darker stones) you may still want that deeper color and shine. “Rouge” may be the answer.

This is a block or stick in white, black, or green for light very dark, and green/gray stones. Use a muslin wheel on a drill or die grinder to pick up some of the rouges. Then rub it on the stone in a small area:  Pop – a colorful shiny finish. 
Tin Oxide powder is mixed with water to create a rubbing paste for a very high sheen (without toxic oxalic acid).

Lifting: Back Preservation

Yeah, stone is heavy. Alabaster weighs 160 pounds per cubic foot and marble 170 pounds.  Brute strength lifting is not wise: thought and cleverness rules here.  Think of the ingenuity of the Egyptians or Mayans of erecting tall stone monuments.

1. Never lose gravity.  If your stone is already off the ground, work vertically. That is use a board and rollers to get it to its destination. Do not lower it to the ground and have to pick it up again.

2. A stone can be walked on its corners. A 200 pounder can effectively become 60 pounds. Three steel pipes of 1.5” diameter can roll a very large block: two under and the third to replace the one coming off the back as it rolls. A pebble placed under a stone makes it easy to rotate.

3. An engine hoist is a relatively inexpensive lifting and moving devise. Wood planks might have to be placed under the small wheels to move it.


See this fun video where a guy moves giant stones via primitive methods:


Drilling Basics

All the stones sold from 2sculpt are safe: no asbestos, arsenic, radioactivity, or trans-fats. Stones of which to be cautious are sandstone and granite (silica), soapstone (asbestos), and jade and copper (heavy metals). This is not to say that they cannot be sculpted; just be thoughtful of the dust. 

You should always wear at least a paper mask (to minimize lung congestion) and safety glasses. If you are using power tools and therefore creating a lot of dust you need ear protection and should have on a respirator. Whereas a paper mask catches about 40% of the dust, a double respirator labeled as P100 will provide about 99% protection (less than $20 for a 3M half respirator).  Gel bicycle gloves without the fingers are my favorite for vibration. There are more elaborate anti-vibration gloves that secure the wrist to minimize carpel tunnel damage.

Chisels

There are hand and air hammer chisels – and rarely should the two meet.  That is an air hammer chisel should never be struck by a hand-held hammer. That distorts the shank of the chisel which, in turn, distorts the piston of the air hammer (very serious). There is a striking cap that can be placed over the air hammer chisel to protect it, though.

Stone carving chisels can have steel or carbide tips.  Steel ones are sharper but need to be sharpened more often.  The carbide ones are much stronger but because of the carbide insert they are “fatter.” On softer stones, the steel chisels produce cleaner lines. On harder stones, the carbide ones make more chips. Note that carbide is a brittle metal so protect these valuable tools from dropping on concrete or smacking against each other.

When using chisels stone must be coming off. If the chisel is held too steeply into the stone (like 90° )the chisel may break. If the chisel is held too acutely (like 15° ) it will just glide over the stone.  Experiment with angles until you are actually carving.  Never, ever use a chisel as a pry bar or try to knock off too big a chunk.

Air Hammer Usage

Air hammers are a major investment. However, they increase speed to about 6 to 7,000 blows/minute. Still, you stay in touch with the stone meaning that you do not lose control; stay “spiritually” connected.  Too often with a saw or grinder, we lose sight of our design – off goes a nose or paw. (Been there!)  The air hammer retains that feeling of hand chisels where we still feel the stone and stay “in control.”

Air hammers are classified by two variables: piston diameter and travel distance.  The larger the piston the more “punch”. So, the small air hammers might have a 5/16” or ½” diameter piston whereas the larger ones might have a ¾” or 1” diameter piston. This has no connection to the size of the chisel. They almost always have ¼” or ½” shanks to fit in the air hammers. 

The travel distance or “stroke” refers to how far the piston goes up and down.  A far distance is called a long stroke and a shorter one is a short stroke.  Again, the longer the stroke the more power. Long-stroke air hammers might be required for hard stone and larger projects. It does take a toll on your wrist but gets the job done. We prefer these air hammers (Cuturi and Trow and Holden) as they have very few parts and are therefore very reliable.  The major difference between these two brands is that the Trow and Holden has long and short-stroke hammers while the Cuturis split the difference and have only medium-stroke air hammers.

One last note: air hammers are controlled by a valve on a short, attached hose. This is called a “whip.” Never run an air hammer full throttle or without the valve.  That is too much air and usually, the valve is opened no more than halfway.

Splitting/cutting stone

Ravinder from India once drilled a series of small holes in a 6’ deep block of marble. He inserted feathers and wedges in each hole and hammered a little on them each hour for a couple of days. Sure enough, the stone developed a crack through the 6’ resulting in 2 blocks.

In marble, determine the bedding plane or grain direction.

Drill the holes, insert the feathers and wedges, and hit them sequentially. Most times the stone will split quickly. If not, wait a few hours or overnight before proceeding to allow the crystals to line up.


Sandbags

For smaller or uneven stones a sandbag will stabilize the art-to-be. You can cut the legs off an old pair of jeans, fill it 2/3rds with play sand, and seal the ends with plastic ties. I like using old truck tire tubes from my car repair place (sometimes a little hard to get, but free). I then cut them in half or thirds and similarly secure them with ties after filling them partially with sand. This way if I hit the rubber “bag” with my grinder it just bounces off rather than cutting it open.

Glue

Sometimes we need to secure a small crack, a micro-fissure, in a stone. Most often a few drops of super glue (Cyanoacrylate) will hold it until you finish working the area. I use the inexpensive stuff but for tight cracks, you might consider the really liquid versions of these better ones: Starbond, Zap, or Jet. They now make gel super glues for slightly wider openings.

In alabaster, this might be all you need to do. However, on marble, this type of glue may not be a permanent fix. Further, this doesn’t work well when you are gluing two pieces together. Epoxy, which is a two-part glue, is much stronger. Again you can use the inexpensive type from the hardware store. There is a more liquid type called penetrating epoxy (Tenax, Wood and Glue, and others). I do prefer the slower curing time ones – 20 minutes versus 5 minutes – to let me position components best.

Final note: If you are gluing two pieces together you may think all is well. However, it is possible that the pieces will break again along the very next row of crystals. Therefore, even though it is kind of a pain, it is best to put a small pin between the pieces which are to be reunited. This might just be a short ¼” stainless rod (or bolt with the head cut off) and then gluing the pieces with the epoxy.

Sanding Tips

You must use silicon carbide sandpaper (or diamond sheets or pads). The grains of aluminum oxide paper quickly round out and stop cutting.

I use the first two grits of sandpaper dry and the rest wet. I wash off the stone between grits and allow it to dry for inspection before continuing. I then use a crayon to note the place I missed and continue. You can use an old sheet of 1000-grit sandpaper for a few minutes between grits to bring out missed scratches. Tongue depressors, ice cream sticks, small flap wheels, cone-shaped tapers, and silicon carbide rubbing sticks all aid in getting into tight places. Silicon rubbing “blocks” are flat surface chunks which, when used wet by hand, can get the bumps out of a surface. (Bumps are often felt while not seen.)
Half your sanding time is on the first grit—getting out those deep scratches. Then the next grit might be 1/4 your time and so on. The last grit is a “breeze.” Scratches hold light. Get them out and the stone glistens.

taper silicon_carbide_flapwheelSC Griding SticksSC Grinding BlockDiamond Hnd Pad

Mounting Sculptures

A base is like a frame. It accentuates the sculpture. It is important to select a base that is not too busy or large for the sculpture. You don’t want to take attention away from your masterpiece. You want to have a stable base but sometimes it looks best if the sculpture overhangs its support. On the other hand, the “footprint” of the sculpture should be at least and generally not much more than 1-1.5″ from the edges of the base. As a very general rule, the height of the base should not be more than 1/3 the height of the sculpture. The base can be granite, irregular stones, steel, plexiglass wood (I like ebony stained walnut), etc.

OLYMPUS DIGITAL CAMERA

©2015 Ken Miduch

This is an art, not a science, so each case is different.

Azzurro Acquamarino Marble

©2015 E. Woodbury

Here is the detail methodology of “basing”:

• Get a flat and level surface to work upon
• Determine sculpture position; secure and hold it
• Mark bottom level line
• Cut bottom; check for flatness (might use a tile)
• On larger bases, cut out center of the bottom to make flattening easier
• Determine hole location in sculpture bottom (find center with a pebble)
• Drill hole with hammer or core drill (consider the bedding plane)
• Determine hole in base: mark sculpture footprint on the base or cut out a template (cardboard or masonite); mark “up”
• Drill base
• Decide on pins: stainless steel or turning pin: gluing one or both sides or using threaded connectors. Consider the ultimate weight of the piece.
• Put non-scratch feet base or adjustable feet on larger pedestal
• Proudly display sculpture

Power Tools

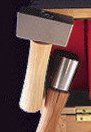
The most important tools are the basic hand chisels, a 1.5# hammer and a rasp. The first power tools should be an angle grinder (7.5 amps or more) and a diamond blade (or a Dremel if working very small) and perhaps a straight “die” grinder. The next step is a big but wonderful one: an air compressor. This will open up the world of lighter but more powerful tools.

Electric angle grinders come in different sizes which refer to the blade size they can accommodate. A 4.5″ or 5″ grinder can both use a 5″ diameter blade with the larger size having a more powerful motor. There are more rare 6″ and 7″ grinders but usually the next step up is 7/9″ “body” grinder. This is used for 7″ and 9″ blades. It is important not to put larger blades than the rating of the grinder. There are two reasons for this. A larger blade (like a 7″ on a 4.5/5″ grinder) will be too close to your fingers. Secondly, blades have safety ratings based upon speed as follows: 5″ blade – 12,000 rpm; 7″ blade – 8,000 rpm; 9″ blade – 6,000 rpm. Check the speed of the gMakita angle grinderrinder you want to purchase.

Again, the higher the amperage the grinder the longer it will last through the dust we create. Get below 7.5 amps and life is usually short. The best brand of 5″ angle grinder is 11 amps. The top brands are currently Makita, Metabo and Bosch. Unfortunately, many of the known “American” brands are made in low-quality producing countries.

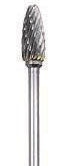
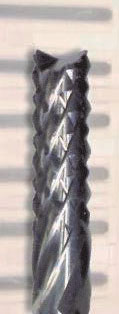
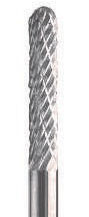
The other electric power tool to consider after the angle grinder is a straight or “die” grinder. These take 1/4″ shank tools particularly burrs. The air versions of these are much lighter and die grinder
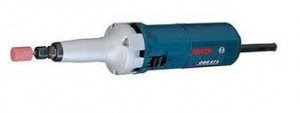
cheaper but use a LOT of air – more than can be produced on a portable compressor. For under $ 150 you can get an electric version that can give you the same, albeit, heavier results.
Compressors open up a whole other world of tools for stone sculpting (and keeping your car tires full). A portable compressor should be rated for at least 4.6 cfm at 90 psi (30 gallons). This will run an air hammer. To drive an air grinder you need a larger stationary machine that preferably has at least 12 cfm at 90 psi (60 gallons). Tank size is noted and is an important variable. If the tank is smaller than these sizes the compressor will be running all the time which will shorten its life.  If you use the portable compressor, as mentioned above, there is nothing wrong with getting an electric die grinder that uses 1/4” shaft tools.


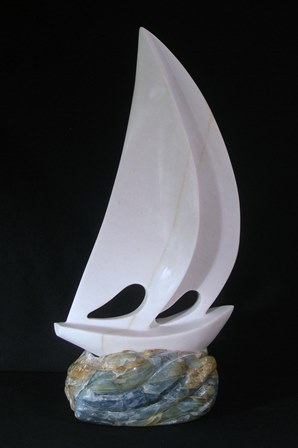
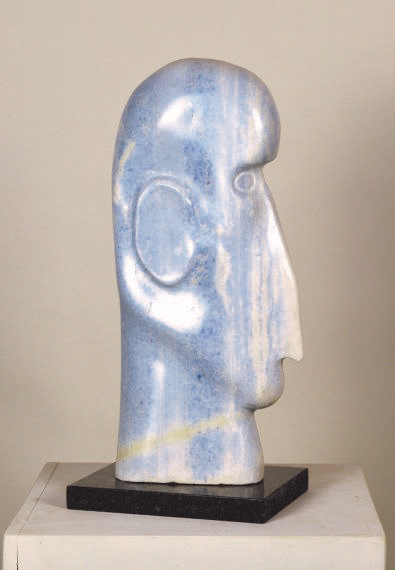
Andes Onyx by Art Wells
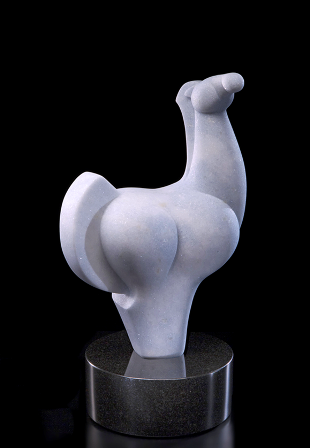
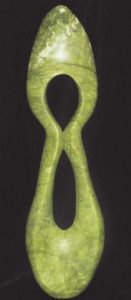
Ming Green by
Syd Summerhill

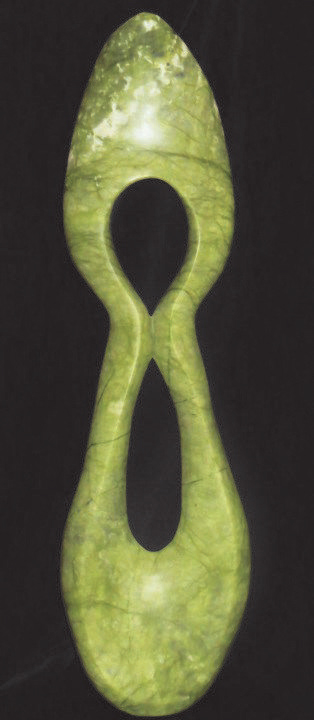
Azzurro Acquamarina by Bart Ingraham